Linux Kernel 0x1
前置知识
内核保护
SMAP(Supervisor Mode Access Prevention)
管理模式访问保护。禁止内核访问用户空间的数据。
SMEP(Supervisor Mode Execution Prevention)
管理模式执行保护。禁止执行用户空间的代码。类似于用户态的NX保护。
ps:在内核命令行中添加nosmap和nosmep禁用。
Stack protector
类似于用户态的Canary。
KASLR
内核地址空间分布随机化。类似于用户态的ASLR。
Kernel Address Display Restriction
在linux内核漏洞利用中常常使用commit_creds和prepare_kernel_cred来完成提权,它们的地址可以从/proc/kallsyms中读取。从Ubuntu 11.04和RHEL 7开始,/proc/sys/kernel/kptr_restrict被默认设置为1以阻止通过这种方式泄露内核地址。(非root用户不可读取)
内核提权
方式
- 修改cred结构体
- 调用
commit_creds(prepare_kernel_cred(0))完成提权
cred结构体
每个进程中都有一个 cred 结构,这个结构保存了该进程的权限等信息(uid,gid 等),如果能修改某个进程的 cred,那么也就修改了这个进程的权限。
struct cred 源码 如下:
1
2
3
4
5
6
7
8
9
10
11
12
13
14
15
16
17
18
19
20
21
22
23
24
25
26
27
28
29
30
31
32
33
34
35
36
37
38
39
| struct cred {
atomic_t usage;
#ifdef CONFIG_DEBUG_CREDENTIALS
atomic_t subscribers;
void *put_addr;
unsigned magic;
#define CRED_MAGIC 0x43736564
#define CRED_MAGIC_DEAD 0x44656144
#endif
kuid_t uid;
kgid_t gid;
kuid_t suid;
kgid_t sgid;
kuid_t euid;
kgid_t egid;
kuid_t fsuid;
kgid_t fsgid;
unsigned securebits;
kernel_cap_t cap_inheritable;
kernel_cap_t cap_permitted;
kernel_cap_t cap_effective;
kernel_cap_t cap_bset;
kernel_cap_t cap_ambient;
#ifdef CONFIG_KEYS
unsigned char jit_keyring;
struct key __rcu *session_keyring;
struct key *process_keyring;
struct key *thread_keyring;
struct key *request_key_auth;
#endif
#ifdef CONFIG_SECURITY
void *security;
#endif
struct user_struct *user;
struct user_namespace *user_ns;
struct group_info *group_info;
struct rcu_head rcu;
} __randomize_layout;
|
状态切换
user2kernel(user space to kernel space)
当发生 系统调用,产生异常,外设产生中断等事件时,用户态会切换到内核态
- 通过
swapgs 切换 GS 段寄存器,将 GS 寄存器值和一个特定位置的值进行交换,目的是保存 GS 值,同时将该位置的值作为内核执行时的 GS 值使用。
- 将当前栈顶(用户空间栈顶)记录在 CPU 独占变量区域里,将 CPU 独占区域里记录的内核栈顶放入 rsp/esp。
- 通过 push 保存各寄存器值。
1
2
3
4
5
6
7
8
9
10
11
12
13
14
15
16
17
18
19
20
21
22
23
24
25
26
27
| ENTRY(entry_SYSCALL_64)
/* SWAPGS_UNSAFE_STACK是一个宏,x86直接定义为swapgs指令 */
SWAPGS_UNSAFE_STACK
/* 保存栈值,并设置内核栈 */
movq %rsp, PER_CPU_VAR(rsp_scratch)
movq PER_CPU_VAR(cpu_current_top_of_stack), %rsp
/* 通过push保存寄存器值,形成一个pt_regs结构 */
/* Construct struct pt_regs on stack */
pushq $__USER_DS /* pt_regs->ss */
pushq PER_CPU_VAR(rsp_scratch) /* pt_regs->sp */
pushq %r11 /* pt_regs->flags */
pushq $__USER_CS /* pt_regs->cs */
pushq %rcx /* pt_regs->ip */
pushq %rax /* pt_regs->orig_ax */
pushq %rdi /* pt_regs->di */
pushq %rsi /* pt_regs->si */
pushq %rdx /* pt_regs->dx */
pushq %rcx tuichu /* pt_regs->cx */
pushq $-ENOSYS /* pt_regs->ax */
pushq %r8 /* pt_regs->r8 */
pushq %r9 /* pt_regs->r9 */
pushq %r10 /* pt_regs->r10 */
pushq %r11 /* pt_regs->r11 */
sub $(6*8), %rsp /* pt_regs->bp, bx, r12-15 not saved */
|
kernel2user(kernel space to user space)
- 通过
swapgs 恢复 GS 值
- 通过
sysretq 或者 iretq 恢复到用户控件继续执行。如果使用 iretq 还需要给出用户空间的一些信息(CS, eflags/rflags, esp/rsp 等)
文件结构
boot.sh
一个用于启动 kernel 的 shell 的脚本,多用 qemu,保护措施与 qemu 不同的启动参数有关
1
2
3
4
5
6
7
8
| qemu-system-x86_64 \
-m 64M \
-kernel ./bzImage \
-initrd ./core.cpio \
-append "root=/dev/ram rw console=ttyS0 oops=panic panic=1 quiet kaslr" \
-s \
-netdev user,id=t0, -device e1000,netdev=t0,id=nic0 \
-nographic \
|
相关选项
1
2
3
4
5
6
7
8
9
10
11
12
| -append 附加选项,指定no kaslr可以关闭随机偏移
--nographic和console=ttyS0一起使用,启动的界面就变成当前终端
-s 相当于-gdb tcp::1234的简写,可以直接通过主机的gdb远程连接
-monitor配置用户模式的网络
-smp 用于声明所有可能用到的cpus, i.e. sockets cores threads = maxcpus.
-cpu 设置CPU的安全选项
|
bzImage
Linux内核镜像文件
vmlinux
vmlinux是未压缩的内核,vmlinux 是ELF文件,即编译出来的最原始的文件。用于kernel-debug,产生system.map符号表,不能用于直接加载,不可以作为启动内核。只是启动过程中的中间媒体
*.cpio
打包后的文件系统
*.ko
有漏洞的驱动文件
init
一个内核启动的初始化文件
启动之前
解包
1
2
3
4
| mkdir core
mv core.cpio ./core/core.cpio
cd core
cpio -idmv < core.cpio
|
或者.gz?
1
2
3
| mv core.cpio ./core/core.cpio.gz
cd core
gunzip core.cpio.gz
|
打包
1
2
3
| $ rm -rf core.cpio
$ v init
$ find . | cpio -o --format=newc > ../rootfs.img
|
2018强网杯 core
checksec
1
2
3
4
5
| Arch: amd64-64-little
RELRO: No RELRO
Stack: Canary found
NX: NX enabled
PIE: No PIE (0x0)
|
开了Canary
题目分析
start.sh
1
2
3
4
5
6
7
8
| qemu-system-x86_64 \
-m 64M \
-kernel ./bzImage \
-initrd ./core.cpio \
-append "root=/dev/ram rw console=ttyS0 oops=panic panic=1 quiet kaslr" \
-s \
-netdev user,id=t0, -device e1000,netdev=t0,id=nic0 \
-nographic \
|
开了kaslr,没有开启SMAP和SMEP
init
解包之后的文件,一个内核启动的初始化文件
1
2
3
4
5
6
7
8
9
10
11
12
13
14
15
16
17
18
19
20
21
22
23
24
| #!/bin/sh
mount -t proc proc /proc
mount -t sysfs sysfs /sys
mount -t devtmpfs none /dev
/sbin/mdev -s
mkdir -p /dev/pts
mount -vt devpts -o gid=4,mode=620 none /dev/pts
chmod 666 /dev/ptmx
cat /proc/kallsyms > /tmp/kallsyms
echo 1 > /proc/sys/kernel/kptr_restrict
echo 1 > /proc/sys/kernel/dmesg_restrict
ifconfig eth0 up
udhcpc -i eth0
ifconfig eth0 10.0.2.15 netmask 255.255.255.0
route add default gw 10.0.2.2
insmod /core.ko
poweroff -d 120 -f &
setsid /bin/cttyhack setuidgid 1000 /bin/sh
echo 'sh end!\n'
umount /proc
umount /sys
poweroff -d 0 -f
|
有vmlinux
IDA分析core.ko
init_module
创建一个proc虚拟文件,应用层通过读写该文件,即可实现与内核的交互。

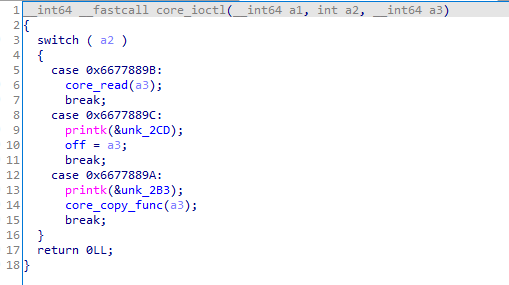
core_ioctl
这个是ioctl函数驱动时进入的函数,可以类比一些mian函数

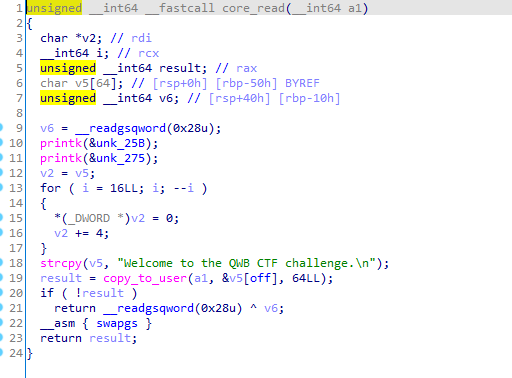
core_read
copy_to_user()拷贝64字节到用户空间a1,全局变量off可控,因此可以控制off的值来泄露canary和基地址
canary值在rsp+40h处

core_write
copy_from_user()从用户态向内核态写入数据,保存到全局变量name中

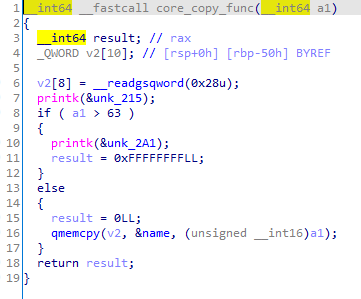
core_copy_func
从全局变量name中copy数据到v2。a1是可控的,绕过a1 > 63 执行qmemcpy()。比较的时候a1是_int64,在执行qmenmcpy的时候是unsigned _int16,当a1是负数的时候,转成无符号数就会非常大,造成溢出。

利用思路
- 设置off
- 调用core_copy_func,泄露canary
- 调用write将payload写入全局变量name
- 调用core_copy_func栈溢出
提权
劫持了流,在用户态的pwn只要弹个shell即可完成利用,但是内核态需要更多操作保证系统的稳定性。
我们劫持的控制流是进入内核态的,拥有特权,因此可以完成提权。
commit_creds(prepare_kernel_cred(0));
执行commit_creds(prepare_kernel_cred(0)); 创建新的凭证结构体使得uid / gid为0
然后执行"/bin/sh"就可以拿到root权限的shell
参考:
https://bbs.pediy.com/thread-262425.htm#msg_header_h2_0
https://ctf-wiki.org/pwn/linux/kernel-mode/basic-knowledge/#struct-cred
https://bbs.pediy.com/thread-259386.htm
http://eeeeeeeeeeeeeeeea.cn/2021/11/13/kernel-pwn-%E4%BA%8C/
https://blog.csdn.net/weixin_35182419/article/details/111951986


